
Fenris recently released a wonderful Lovecraft-inspired New England Colonial style house, called 'The Griffin House' as part of a new range of scenery, called Arkham Avenue.
I missed out on the pre-release deal over xmas, as I was skint, but saw Steders on the FU:UK board was flogging one at the same price, so I had to have it.
Rather than let it sit in a cupboard, as is what usually happens to my scenery projects, I was determined to get it built, and this is where it gets complicated. As it was presumably a pre-release one, it didn't have any instructions with it, and Fenris haven't put full construction details up yet, so I was flying solo, as it were. This is a sort of stream of consciousness, as much as it's a build explanation, but hopefully it might help a few people making it.
So, here goes...
First up was the ground floor. Fairly easy, just had to make sure it was all square, the walls are marked, and fit together with the letters on the outer surface, in alphabetical order, G-L for the ground floor, A-F for the first floor, and M-R for the second.
I did get two of the long front 'J' section (two windows and the inner door) as one didn't have the cutout for the first floor to sit in, so I ignored that one after a bit of puzzling.

Next bit, the first storey. Again, all straightforward, just making sure it's square with the ground floor. (you can see the letters a bit better here) The floors are all removable, bar the ground floor, which I glued into position for stability. Eventually I'll put in some inner walls and furniture.

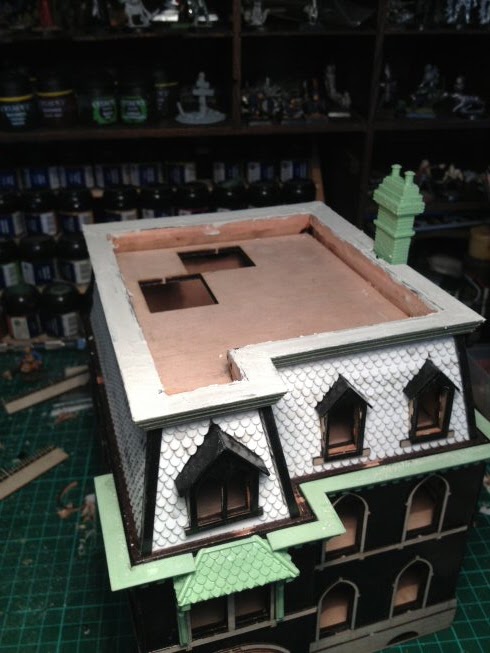
And the second (roof) storey. Again, the actual roof section is glued into position, to aid in structural stability and keeping it square.

Then it was a case of fitting the plasticard outer surfaces to the ground and first floors. This was easy, and matched the plywood carcass perfectly, which was helpful. I used superglue for attaching the plasticard to the plywood, and then liquid poly to seal the corners for later filing.
Warning: Superglue and plywood are VERY unforgiving, it'll grab and not let go incredibly quickly. You don't get much room for manoeuvre so place your pieces carefully if you're using this method. I'm sure there are other glues that would work just as well and give you more time, but I'm an impatient bugger and liked that it grabbed straight away so I could move on to the next section.
Next up was moving on to the ply detailing pieces, such as window surrounds etc. Now, this is where the problems with the kit started.
As you can see from the pic below, the rear layer of the front window section didn't match up with the cut-outs on the carcass, but the front layer did.

It wasn't a massive problem to fix as you can see below, just a case of chopping the end of the left hand side off, and gluing it to the right, but it annoyed me slightly.


More of the detailing pieces fitted. These all fitted correctly with no problems. The small drop-down tabs below the windows on the first floor work as locators so it fits squarely to the ground floor. They're not the most substantial of pieces, so I hope they'll stand up to the building being dismantled and put back together repeatedly. Time will tell.

And a quick photo of the rear elevation. As with 'real' houses, this is far less ornamental than the frontage. It's kind of a reverse mullet theory; "Party up front, business at the back", but I digress.

Fitting the ornamental architrave on the front elevation. It came as two pieces, the left of the main window, and the right of it. I found I had to cut the right hand side into several pieces and trim to shape, as it didn't fit anywhere near as it came out of the pack. Not a major problem, but it would have been easier if it came in three 'L' shaped pieces; Left of the window, right of the window, and the part above the two right hand windows.

Next up, fitting the shingles. Fuck me, this was tedious. I can see, why it was done this way, as when done, it looks bloody good, but it took me three straight evenings. It might have been better to do it as resin sections, though that would obviously add to the cost.

The corners (which are to be covered up) were just chopped to shape with the scalpel:

A quick test-fit of the roof discovered a problem. Fitting the shingles down to the base of the second storey meant that the size increased too much to actually fit in the roof space. The murderous pirate below considers his options:

As you can see, he's really quite pissed off:

But, thanks to his handy meat cleaver/my scalpel, we managed to work out a solution between us:

Chopping off the bottom couple of layers of shingles on the back and front of the roof section dropped the size enough to make it fit again, and it was hidden below the level of the wall it sat behind.
The third side of the roof, showing the chimney detail:

The dormer windows went on before fitting the shingles to the frontage, and they were a nightmare. Very thin ply, and really quite fiddly, so they were quite tricky to get square. I think I may have also fucked up mildly, as I put the plastic roof sections on first, and then shingled up to them. I think the shingles may have wanted to go on first, but never mind, looks ok.

Next uip was fitting the roof flashing sections. Again, these came as one piece 'U' shaped sections, but didn't fit in any real way, so I had to chop them in half, as you can see below:

And with all of them finished. They also needed the bottom of them all chopping to fit, in the same way the shingles did. The gaps will be finished with some more (supplied) resin architrave:

And a rear view of the same.


This was fairly easy though, just a case of chopping off one end of each piece, so it shortened it enough to fit in the roof section:

Next up, the top resin architrave sections were cut (mortice blocks, Yay!) then glued on, and finally filled, to hide all the holes, gaps and bits of my skin superglued to the plywood:
Then is was a case of fitting all the sash windows. Again, a fairly easy job, if a bit fiddly, as it's about 1mm thin ply, and as they're unlabelled, it was a case of 'try it and see', a couple of dozen times. This was where I encountered the most serious problem in the whole build. I fitted all the windows as a process of elimination, apart from one. That last missing window had two potential windows, neither of which fitted. Which was a bit confusing, to say the least:

Eventually, I chopped a couple of mm out of the centre of the left hand window above, and got it to fit, but if you were planning on breaking into the house, that's where I'd start.
So, eventually, after about 5 days, a lot of swearing, and some very superglued fingers, Voila! One Griffin House, built! See my magnificent erection and bask in it's glory!
*cough* sorry. Erm, what I meant to say was, here, dear reader, are some pics of the finished build.
Front:

Right hand side:

Rear Elevation:

And the left side:

A few other problems/pitfalls I noticed along the way.
The plasticard for the inner hallway is too tall and is the full height of the ground floor. It's a simple fix, I just chopped the top off, so the floor will fit onto the locator tabs you can see at the ceiling level, but it just needs revising in the next batch so save work.

Also, one of the second storey staircase treads is missing a laser cut on the CAD file.

Fenris really have knocked out a magnificent piece of kit with this one, and they're really showing what can be done with laser cut wargames terrain. Once it's done, it doesn't look like a laser cut kit, and that's the failing of a lot of the kits out there.
Having said that, it's not without it's flaws. Lack of instructions are a major sticking point. (Fenris, if you read this, and for some reason want it expanding and working on, give me a shout, but I'm sure you've got your own instructions on the go. I've noticed that you've added some more instructions to your site since I started building mine) A couple of design flaws that need to be revised in future issues as well make it not quite suitable for anything less than a fairly competent modeller, which is all I'd call myself.
Having said that, I think this was one of the very first released ones, so these issues could have been dealt with already.
Next job, painting it, and designing the interior... Watch this space.
Looking great. Mine is still a WIP.............
ReplyDeleteSorry, mis-pelt in the the last post...damn these old fingers....should have said 'oh, and I will use the later pics to finish mine!'
ReplyDeleteCheers!
I know it's been a long time since you had to build one of these, but I wanted to ask if you could recommend a good point in the build process to put in some clear plastic for the window glass?
ReplyDeleteI want to buy one of these and was unsure if it would be feasible to add it in sandwhiched of the between the wall and window frames.
I'm actually planning on fitting glass windows (at some point, it's still sat on the shelf staring at me!) , you can do it once it's finished, or, it'd be slightly easier if you did it before fitting the frames.
DeleteI want to buy two sets, so that I may add an extra story to the house. Do you think that's feasible?
Delete